
Entering your first inventory
At this point you should have your products completely setup and your inventory locations setup. Now you need to decide how often you will be taking inventory, this is called an inventory period. You can take inventory as often as you like, the standard is one time a week, known as a Monday-Sunday inventory period. In this help doc, we will use a once a week inventory period as an example. *The process is the same if you take inventory daily, bi-weekly, or monthly.
Let's get your first inventory going.
Open up your saved file with all of your product setup data entered. Once open, you can save this file as new name for the first inventory period. We recommended using the inventory period dates as the file name (ie. 4-8-20 thru 4-14-20).
To start your first inventory period, you have to count your beginning on-hand inventory. This is the amount of product that you have in stock before the business open on the first day of the inventory period. You will count your beginning on-hand inventory Sunday night after close or Monday morning before open, when taking inventory weekly. Your inventory data is entered by clicking on "Inventory Counts" and going to the specific category and then inventory location.
At this point your inventory locations will be empty other than product names (see setting up inventory locations).

Now it's time to enter your on-hand inventory data into your inventory locations. How you enter inventory counts will depend on if you are weighing (see how to weigh inventory) or point counting (see how to point count inventory).

Once you have all of your beginning on-hand product is entered into each inventory location (this needs to be done for each main product category that you are using to tracking inventory) you can continue to the final steps of getting your first inventory period started.
If you go to "Analytical Metrics" and look at the usage data for you products at this point, things just don't make sense. All of your usage numbers are shown as negatives. You might go hmm... did I mess something up? No, the usage data should look like this right now.
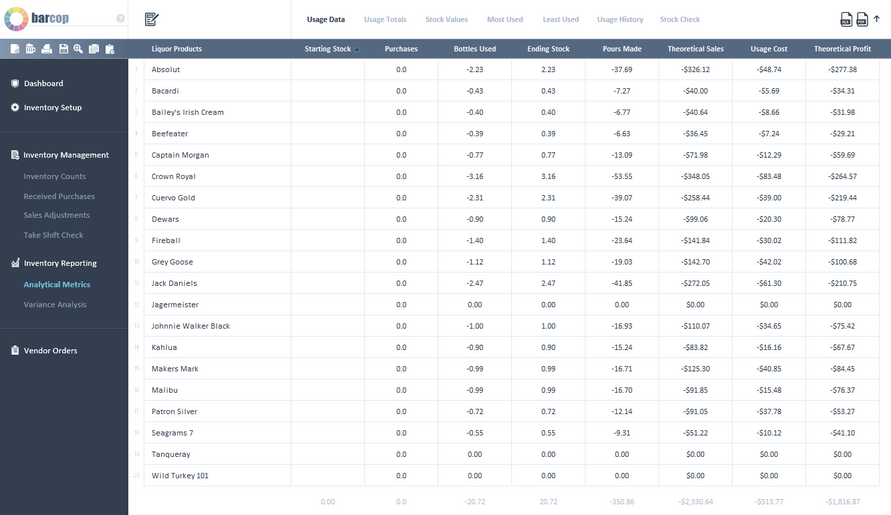
So what's going on?
When you look at the usage data at this point: The on-hand inventory that you entered will be totaled up in the "Ending Inventory" column and all of your usage data will be a bunch of negative numbers that do not make sense because there isn't a starting inventory to compare against.
When you enter numbers into inventory locations, you are always entering your ending inventory numbers (your on-hand inventory at the end of an inventory period), EXCEPT on your very first inventory.
OK, let's get this fixed...
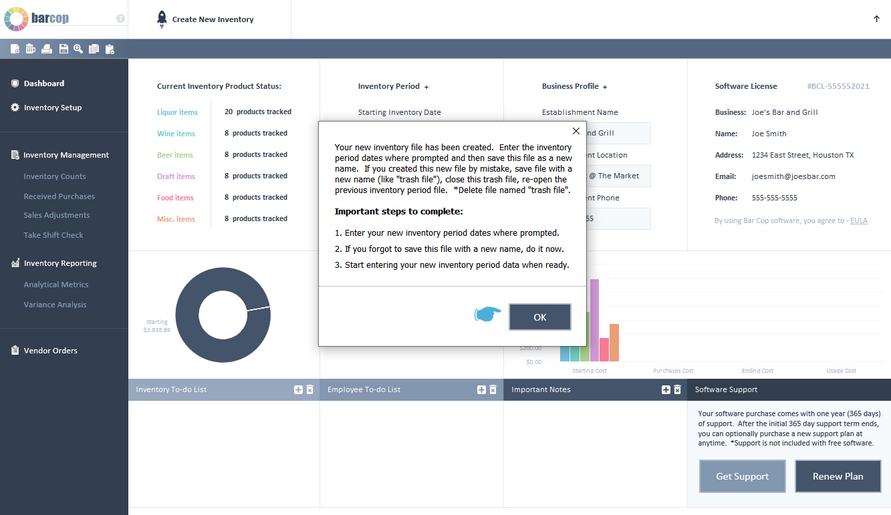
We need to get those ending inventory numbers into the starting inventory column. To do this, go the dashboard for one final step. On the dashboard, click on "Create New Inventory". When the dialog box opens up, click "Create".
Important: You will see a list of things that are about to happen in the dialog box. Part of the list will not apply during this first inventory setup process.

When the process has completed, click "OK" on the completion dialog box and go ahead and enter your first inventory period start and end dates.
Now go back to "Analytical Metrics" and look at the usage data again. When you created a new inventory file, the ending inventory numbers were transferred to the starting column and all those crazy negative numbers are now zeros. When you enter your new ending inventory data (counts you take at the end of your first inventory period), these usage numbers will update. If you go take a look at your inventory locations, you will also see all of starting on-hand inventory numbers previously entered are now gone and those sections are ready for you to enter new counts at the end of your first inventory period.

That's it. Your first inventory period file is setup and ready for your ending inventory numbers to be entered at the end of your first inventory period. You can now save and close this file. Do not change the file name - it should have already be named for your first inventory period.
Completing your first inventory period:
When your first inventory period is over, it's time to take your second physical inventory (the ending inventory counts of your first inventory period).
Step 1: Open up the saved file you created for your first inventory period.
Step 2: Enter your ending inventory counts into your inventory locations.
Step 3: Enter any purchases that you received during the inventory period (see entering received purchases).
Step 4: Make any adjustments that you need to (see entering sales adjustments).
Step 5: Enter register sales in Variance Analysis reports (see variance analysis reports).
Step 6: Check your analytical reports (see analytical metrics reports).
Step 7: Save the file after making any changes, keeping the same file name.
Step 8: To start your 2nd inventory period, you will create a new inventory file (see creating a new inventory file).
Things to know:
1) You can enter purchases that you receive during an inventory period at anytime by opening your current inventory period file and saving the file once purchases are entered.
2) Adjustments should only be entered at the end of the inventory period at the same time when you are entering your ending inventory counts.